The Provident Homemaker
  • Recipes and Info
    • Making Bread
  • My Blog
  • Favorite Resources
  • Documents and Files
  • 52 Weeks of Building Storage

Week 43 - Fats and Oils in Your Food Storage

2/10/2020

2 Comments

 
To help with building your year's supply (this is Week 17 of 26), see this chart. 

A long time ago, in an article on the importance of storing fats and cooking oils, I read about how having oil lets you turn ‘nearly nothing’ into satisfying, filling foods.  Squash blossoms are one example.  They’re nearly nothing, calorie-wise. But mix up a little thin pancake batter, dip the blossoms, and fry them—and then they’re really something!  Squash plants produce male flowers and female flowers; you pick and cook with the male flowers, leaving the female flowers to grow into squash. Because the male flowers can’t.  (If anyone knows where that earlier article was, I'd love to know!)

Here’s a recipe for .cheese-stuffed fried squash blossoms  How about stuffing them with your own cheese, made from your sour milk or powdered milk?
 
What do you need to know about storing fats and oils?  Here’s the Cliff Notes version--
  • Any kind of fat or oil can be stored, but some last longer than others. 
  • Use what you store
  • Store oil or fat as cool and dark as you can. It makes a big difference.
  • Nothing is so sure as change—and the science of what we know about fats has caused some major shifts.
 
Here’s the longer version-- I’ve modified what is in the “Bee Prepared Pantry Cookbook”, available as a free pdf. 
 
Contents
WHY STORE FAT?. 
FATS? OIL? WHAT’S THE DIFFERENCE?. 
STORING FATS AND OIL. 
STORAGE LIFE. 
TYPES OF FATS. 
USING FATS AND OILS. 
 

WHY STORE FAT?
We need fat! Fat is essential in every diet.  Fats and oils play an important role in our perception of taste and texture and their absence would make many foods more difficult to prepare and consume.  A small amount of dietary fat is necessary for our bodies to properly absorb fat-soluble vitamins like A, D, E, and K.  Coconut oil, cooking oils, butter, ghee, peanut butter, mayonnaise, and shortening are suggested for storage. (“Shortening” is really a term that means a fat that is solid at room temperature, so it includes lots more than the stuff that comes in a big paper can.)
 

FATS? OIL? WHAT’S THE DIFFERENCE?
All oils are fats, but not all fats are oils. They are very similar to each other in their chemical makeup, but what makes one an oil and another a fat is the percentage of hydrogen saturation in the fatty acids of which they are composed.  The fats and oils which are available to us for culinary purposes are actually mixtures of differing fatty acids—saturated fats are solid at room temperature (70 F) and the unsaturated fats we call oils are liquid at room temperature. For dietary and nutrition purposes, fats are generally classified as saturated, monosaturated, and polyunsaturated. This is just a further identifying of the amount of saturation of the particular composition of fatty acids in the fats. 
 

STORING FATS AND OIL
Exposure to oxygen, light, and heat are the greatest factors to rancidity.   Transparent glass and plastic containers should be stored in the dark, such as in a box.  They should be stored at as cool a temperature as possible and rotated as quickly as is practical. 
 
Oxygen is eight times more soluble in fats than in water and it is the oxidation resulting from this exposure that is the main cause of rancidity. Generally, the more polyunsaturated a fat is, the faster it will go rancid.  This may not at first be readily apparent because vegetable oils have to become several times more rancid than animal fats before our noses can detect it.

STORAGE LIFE
Unopened cooking oils have a shelf life of about a year or two before becoming rancid, so you need to be using what you store!  Eating rancid fats—in addition to having off-flavors—can lead to vitamin and protein deficiency, since the rancid fats destroy them.  Vitamins A, D, E, and B7 are among those at risk. Oils don’t magically go rancid after hitting their ‘best by’ date; it’s a process. My personal experience is that oils stored below 70°F, in the dark, take at least twice as long to go rancid as those stored in brighter conditions above 70°F.
 
Once opened, some oils should be refrigerated. (See here for an explanation.)  If the oil turns cloudy or solid, it is still perfectly usable and will return to its normal liquid, clear state after has warmed to room temperature.  Left at room temperatures, opened bottles of cooking oils can begin to become rancid in anywhere from a week to a couple of months, though it may take several more months to reach such a point of rancidity that it can be smelled.

Olive oil also oxidizes as it sits; after a year or two, even your extra virgin olive oil would no longer pass the EVOO tests.
 
The culinary fats with the longest shelf life as they come from the store are coconut oil, cans of shortening, and sealed jars of ghee.  Butter is sometimes canned too. (Red Feather sells butter in sealed metal cans, with a long shelf life.) See here for what you need to know about canning butter at home. Solid shortening now is usually composed of partially hydrogenated vegetable oils and/or naturally saturated palm oil, but there are some that also contain animal fats.
 

TYPES OF FATS
For a list of some of the healthiest fats, see here. 
 
Monounsaturated fat remains liquid at room temperature but may begin to solidify if refrigerated. 

Polyunsaturated fat is liquid at room temperature and when refrigerated.
 
Omega-3 fatty acids are polyunsaturated fats found mostly in seafood as well as flaxseeds, flax oil, and walnuts.  Eating Omega-3 fatty acids appear to decrease inflammation in the body.  The latest research indicates we do best eating a 1:1 ratio of Omega-6 and Omega-3 fats.
 
Saturated fat is usually solid at room temperature.
 
Trans fat is the result of adding hydrogen to vegetable oil.  This makes it solid and gives it a longer shelf life but causes inflammation. Look for the words “partially hydrogenated” or “fully hydrogenated” on the ingredient list to detect trans fats.
 

USING FATS AND OILS
The conventional wisdom used to say that to increase good fats and decrease bad fats, use canola oil when baking. It appears now that’s wrong.  Coconut oil is the healthier fat – and new evidence points to nutrition benefits of using butter; both work wonderfully in baking. The more processing it takes to make an oil or fat, the more it tends to promote inflammation.
 
Use olive oil, coconut oil, or ghee instead of butter when sautéing; they have a higher smoke point.
 
Use olive oil rather than vegetable oil in salad dressing. You can use olive oil or avocado oil in making homemade mayonnaise, and there are even recipes for making it with coconut oil. (Homemade mayo is worlds above store-bought!)
 
Store what you use, and use what you store.
 
If oil has gone rancid, it can still be useful in your storage—it can be used for light and heat.
 
What other questions do you have about storing and using fats and oils?

2 Comments

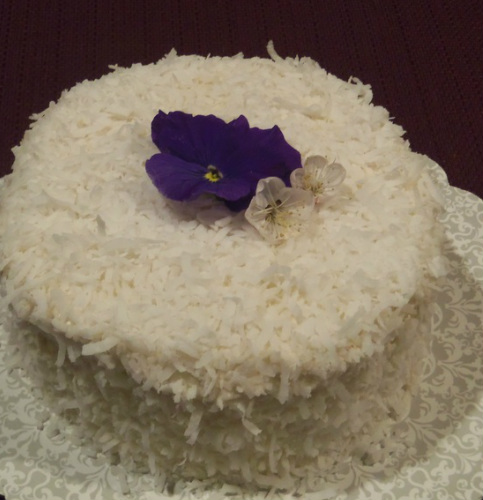
Coconut Cake- using coconut flour and agave

4/1/2014

0 Comments

 
Picture
This gluten-free cake is high in fiber, but you'd never know it when eating it.  It just tastes like a moist coconut cake.  It also has a delicious cream cheese frosting that you can sweeten using agave or honey, and a lemon-cream cheese filling between the layers.  This makes a small cake, 6" round if two layers, or a single 8" layer:  a much better size for most people!

Coconut Cake:

4 large eggs
1/2 c. melted coconut oil
1/2 c. agave nectar
1 Tbsp. vanilla
1 tsp. coconut extract
1/2 c. coconut flour
1 tsp. baking soda (this is too much, I can taste it and the cake overbrowned)
1/4 tsp. salt
1/8 tsp. xanthan gum
1/2 c. shredded coconut, either sweetened or unsweetened
Cream Cheese Agave Frosting (recipe below)
1 1/2 Tbsp. orange or lemon marmalade
1 cup sweetened shredded coconut 

Preheat oven to 350 degrees.  Grease sides and line bottom of a 6" round pan* with a circle of parchment paper.  Set aside.

Whisk eggs until light in color and a little foamy, about 2 minutes.  Add the coconut oil, agave, vanilla, and coconut extract; mix well.  Add coconut flour, then put the baking soda, salt, and xanthan gum on top of the coconut flour, and mix all together.  The batter will be very thin at first, but will thicken within minutes as the coconut flour begins absorbing liquid.  Stir in the 1/2 c. shredded coconut.

Pour into the prepared pan.  Bake until center no longer jiggles and toothpick inserted in center comes out clean, about 45 minutes.  Run a knife around the outside edge of the cake to loosen it.  Cool cake, in the pan, on a cooling rack for 10 minutes.  Remove from pan/s and cool completely.

When cool, split the 6" cake into two layers.  Frost the first half with lemon-cream cheese filling.  Place the other layer on top of the filling, then frost the entire cake.   Pat coconut onto the sides of the cake, then sprinkle it all over the top.
  
*If you don't have a 6" round, you may use either one 8" round (reduce baking time to about  30- 35 minutes), a 9x5 loaf pan (about the same baking time), 12-15 cupcakes (about 30-35 min. of baking), or four 4" round pans (reduce baking time to  18-20 minutes each).

Cream Cheese Agave Frosting:  use the recipe for Fluffy Honey-Cheesecake Frosting, except substitute agave for the honey.

To make the lemon-cream cheese filling (or orange-cream cheese filling), take  3/4 cup of the Cream Cheese Agave Frosting and put it in a small bowl.  Add 1 1/2 Tbsp. marmalade and stir.  
0 Comments

Moist, refined sugar free, grain-and-gluten-free Chocolate Quinoa Cupcakes

3/14/2014

0 Comments

 
Picture
A friend recently shared this delicious recipe with me.  Since I wanted to make cupcakes for a friend who can only handle sweeteners like honey and agave, it was time to tweak the recipe.  You can find the original, sugar-sweetened, recipe here, if you want to compare it to my version. As cupcakes, they needed more moisture than the original, plus a couple things needed adjusted to allow for honey.  And I discovered that the amount of water your quinoa was cooked in makes a huge difference in whether they're dry, moist, or collapse when baking.   (Not to worry, the problem should be solved now!)   Quinoa is technically a seed and not a grain.

I tried really hard to find a way to use just the blender to make the batter, and not need both it and a bowl, but the batter puffs up so much once the leavening is added, that it just didn't work out that way .  Oh well.

Everyone who has tried these loves them.

Moist Chocolate Quinoa Cupcakes

1/2 c. uncooked quinoa*
1 1/4 c. water 
1/3 c. any kind of milk (dairy, almond or coconut are fine)
4 large eggs
1 tsp. vanilla
3/4 c. melted coconut oil or other liquid vegetable oil
2/3 c. honey
a few drops of orange essential oil, or the washed peel of one clementine, optional
1 c. unsweetened cocoa powder
1 1/2  tsp. baking powder
1/2 tsp. salt

Cook the quinoa, covered, in the 1 1/4 cups water:  either combine in the microwave or stovetop.  To microwave,  put them in a microwave-safe bowl, cover, then cook for 5 minutes at full power, then 5 minutes at 50% power.  For stovetop:  combine in a pan that has a tight-fitting lid.  (If the lid isn't, use 1 1/2 cups water to compensate for what will evaporate.)  Bring to a boil, reduce to a simmer, and let simmer for 20 minutes, until water is all absorbed.
*or use 2 cups cooked quinoa and omit the water.

Preheat oven to 375 degrees.  Put liners in 18-24 cupcake tins, depending on how high you want the cupcakes.

Combine in a blender the cooked quinoa, milk, eggs, vanilla, oil, honey, and orange oil/peel if using it.  Blend until smooth.   Mix the cocoa powder, baking powder, and salt in a medium bowl.   Pour the quinoa mixture over the top, and stir until well-combined.  Spoon into cupcake liners, or use a spring-loaded ice cream scoop instead to portion out the batter.

For an easy, sweet topping, sprinkle each cupcake before baking with a few semisweet chocolate chips and chopped pecans or other nut.

Bake for about 20 minutes, until the top of a cupcake springs back when lightly pressed with a finger.

Frost with your favorite frosting if you like, or  try any of these.   The cupcakes above are frosted with whipped coconut cream with melted chocolate beaten in:  use 1 cup of chilled coconut cream and 1 cup melted semisweet chocolate.  Whip the cream until it starts to hold soft peaks, then add in the chocolate plus a teaspoon of vanilla and a pinch of salt.  Beat until fluffy and smooth.


0 Comments

'Clean Eating' Paleo Fudge

12/10/2013

1 Comment

 
Picture
Are you trying to eat healthier but really, really crave fudge?  This one uses healthy fats and honey.   It's also dairy-free and gluten-free for those who need to avoid those.  

Avocados are high in three amazing fats: both phytosterols and PFAs (polyhydroxylated fatty alcohols) are documented to be anti-inflammatory, and oleic acid, which helps our digestive tract absorb fat-soluble nutrients.  Coconut oil is healthy for many reasons, including being anti-inflammatory and having a high lauric acid  and medium-chain fatty acids content.  
But enough about that.

The big question is, doesn't avocado totally mess up the flavor here?

No.  I have a pretty discriminating set of tastebuds, and the only way I can detect the avocado is by a faint fruity flavor.  Because of that, some of my favorite variations of this fudge include fruit:  orange zest or oil, chopped dried cherries (and toasted almonds!), and the like.  This fudge is really only a slightly thicker version of my ChocolateTruffle Pie.

The recipe below includes both orange and pecans; if you don't want them, just omit the pecans and orange zest or orange oil.

You can also use this recipe to make truffles; cut into squares, then quickly roll each square into a ball; roll in cocoa powder or chopped nuts to coat.

Orange-Pecan Fudge            makes about 3/4 of a pound 

1 ripe avocado, peel and pit removed
1/4 c. coconut oil
1/4 c. honey
1/4 c. unsweetened cocoa powder
2 Tbsp. water
zest from half of an orange (about 1/2 Tbsp.), or 2 drops orange essential oil
3/4 tsp. vanilla
pinch of salt (1/16 tsp.)
1/4 c. toasted chopped pecans

Line a 5 1/2 x 3 loaf pan (or 2-cup rectangular or square container) with foil; spray with nonstick cooking spray.   Set aside.
Put the water, zest (should be about 1 Tbsp), honey, coconut oil, cocoa, avocado, vanilla, and salt in a blender or food processor.  Run on high for 1-2 minutes, until smooth.  Pour into prepared pan.  Cover and refrigerate 2-3 hours until set.   

Store in the refrigerator or freezer.  If freezing this, let pieces thaw about 10 minutes before serving.  I don't know how long it will keep in the fridge because it gets eaten so quickly.   But the one piece that survived us for a week and a half was still good.  Any longer than a week, though, it'd be better preserved in the freezer.  Wrap tightly.

1 Comment

Honey-orange dressing

12/7/2013

0 Comments

 
Picture

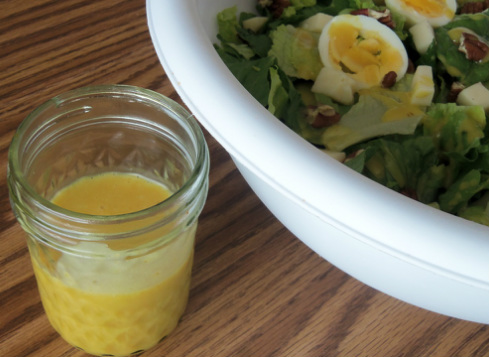
Yesterday I got to have lunch with some friends at a neighbor's house.  We each brought something; Emily, whose house we met at, made Apple Butternut Squash Soup; this link goes to the recipe on her website.

I had lots and lots of Romaine lettuce on hand, thanks to another friend...  so a salad seemed in order.  I started out intending to make honey-mustard dressing, but it lacked something... so I looked around the kitchen to see what to use.  In went some orange peel and the white parts of some green onions.  

Oh.

That was good!

Next about a pound of lettuce and the green parts of three green onions were mixed with around half of the dressing; just enough]to lightly coat.  Then four or five sliced hardboiled eggs went on top, 4 oz. of cubed cheese, and a big handful of toasted pecan pieces.  
Everyone loved it, except the person who didn't try it because she's allergic to eggs and nuts. :/

This would be delicious brushed onto chicken a few minutes before done baking.

Honey-Orange Dressing  Makes about 1 cup

1/4-1/3 c. honey (depends if you want this more sweet or more tangy)
1/4 c. apple cider vinegar
1/4 c. olive oil
1 tsp. prepared mustard
1/4 tsp. salt
1/4 tsp. pepper (I used 2 drops of essential oil)
2 Tbsp. onion (I used the bottom 1 1/2" from 3 green onions)
1 1/2 tsp. orange zest (I used about half the peel from a clementine)

Throw everything into a blender; puree until smooth.  


0 Comments

Turkey Ramen Cabbage Salad

11/30/2013

0 Comments

 
Picture
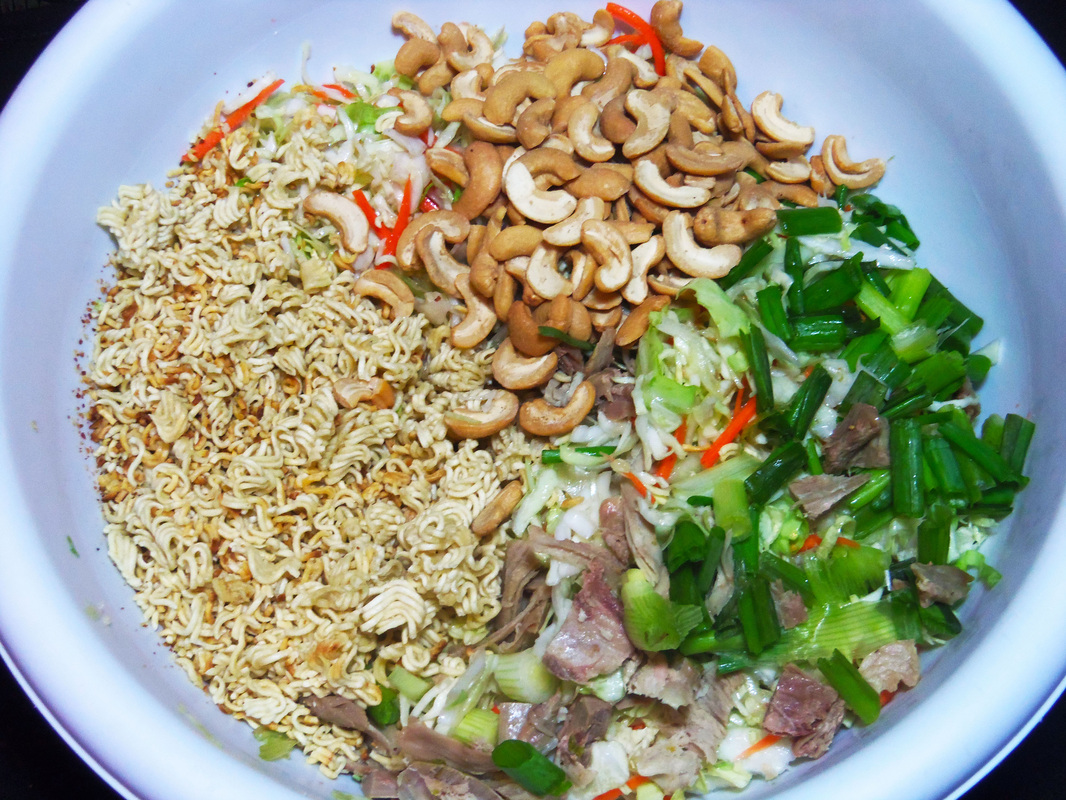
Most salads like this use so much dressing that there's a pool of it at the bottom of the bowl.  And the dressing is about all you taste.  
Not this one.  There's enough oil in the salad to help you unlock those fat-soluble vitamins; both cabbage and cashews are very high in Vitamin K.  And you can actually taste the cabbage, in a way that accents only its best features.  

If you have any left over, even though the noodles will not stay crunchy by the next day, the cabbage does.

Cabbage Ramen Salad        Serves 4-6.  Or two who really, really like it.

1 tsp. olive oil
1 package Ramen noodles
2 Tbsp. olive oil
1 Tbsp. rice wine vinegar or apple cider vinegar
1 Tbsp. honey or sugar
1/2 tsp. salt
1/4 - 1/2 tsp. black pepper
1/2 tsp. ginger OR 1 1/2 tsp. chopped crystallized ginger OR 1 drop ginger essential oil
1 small cabbage, shredded, OR a 14-16 oz package coleslaw mix (cabbage and carrots)
2 green onions, chopped
1 c. cooked turkey or chicken, diced
1/2 c. cashews, optional

Heat 1 tsp. olive oil in a large skillet on high heat.  Break the Ramen noodles into small pieces and add to the hot oil.  (You won't need the flavor packet for this recipe.)  Stir dry noodles constantly for about 2 minutes, until some of the noodles start turning a toasty brown.  Remove from heat and set aside. 

In a medium bowl, combine remaining 2 tbsp. olive oil, vinegar, honey/sugar, salt, pepper, and ginger. Stir well to combine.  Add the cabbage or coleslaw mix, green onions, turkey/chicken, and cashews.  Stir thoroughly, until no puddle of dressing remains on the bowl's bottom.  Serve right away for the crunchiest noodles.  

0 Comments

Sweet Potato Curry with Turkey

11/28/2013

0 Comments

 
Picture
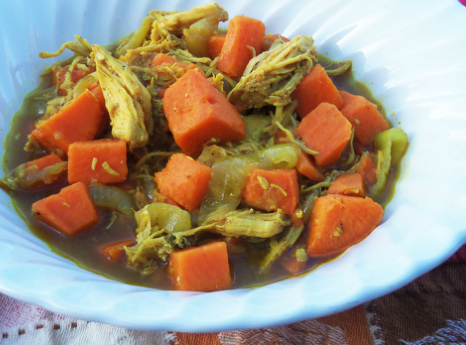
Curry is becoming known as a  bit of a superfood.  The spice blend's famous color is from one of its ingredients, turmeric.  Turmeric is now known to reduce inflammation- brain, systemic, and joints.  Here's a great way to use up some leftovers in a flavorful, healthy way!
Curry has an affinity for sweet, so it mixes perfectly with sweet potatoes or yams.

When I was in college, I lived in the cheapest off-campus apartment around.  There were several foreign students in the complex, and one day we had a potluck dinner together.  
One of the first foods on the table was an amazingly yellow... something.  So I asked what it was.  "Curry," she responded, "It's a food from Korea.". 
Further down the table was another bowl of yellow food.  I asked about it.  "Chicken Curry," she explained, "The Jamaicans invented it."  
Another friend walked up with a now-familiar color.  I asked. 
"Curry.  It's from Africa."

It was good.  All three were.  Good enough I could see why everybody claimed it was from their own native country.

Since my roommate was the Jamaican, that's whose recipe I got, though I had to watch her make it and estimate the amounts at the time.  This recipe is based on hers, though she used bone-in chicken thighs, less onion but added a couple green onions,  potatoes instead of sweet potatoes, and serve it not only over rice, but also with thick, chewy 'Jamaican Dumplings'.  The recipe is flexible.

Curry.  From America.

Sweet Potato Curry with Turkey- makes about 6 cups

2 Tbsp. oil
1-2 Tbsp. curry
2 medium onions, sliced into rings
1 c. cooked turkey, cubed (can use chicken instead)
1 lb. sweet potatoes, peeled and cubed*
1/2 tsp. salt
1/4- 1/2 tsp. pepper, to taste
water

*I used raw sweet potatoes, but feel free to use cooked ones- you can even get away with using leftover Thanksgiving baked sweet potatoes as long as they're not too saccharine; reduce cooking time accordingly.

Heat oil on medium-high heat until shimmering-hot.  Add the curry powder- amount depends on how strong you like it.  (I like it strong.)  Stir, and let it heat for about a minute to 'bloom' the flavor.  It's done when it starts to smell delicious and a little toasty. DON'T burn it.  (Nasty, bitter flavor!...)  Reduce heat to medium, add onion; cook until they are tender, stirring occasionally.  
Stir in turkey, then add sweet potatoes, salt, and pepper.  Add water until the food is nearly covered.  Put a lid on the pan and simmer, covered, for about 20 minutes or until just tender.  Remove lid, increase heat and gently boil until liquid is reduced by about half.  

Serve hot by itself or over rice.

Optional:sprinkle with any of the following:
chopped peanuts
green peas
mandarin orange segments
shredded coconut
diced apple
dollop of sour cream or unsweetened yogurt
chopped hardboiled eggs
bits of dried fruit

0 Comments

Caramelized Butternut Squash with Rosemary

11/23/2013

0 Comments

 
Picture
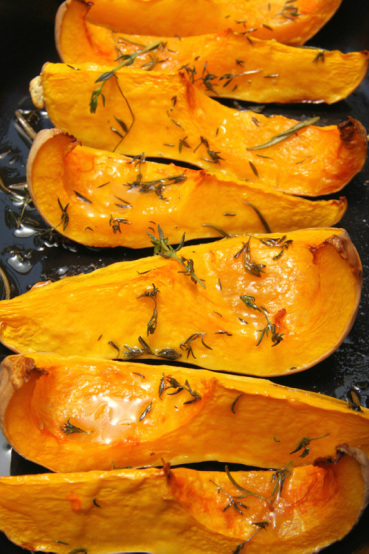
How about this for a new side dish?  I love rosemary and olive oil. Or butter.  Or both.  :)

This recipe showed up at my house this week in a save-the-farmlands newsletter, of all things.  (I'm all for saving farmlands, but how about nixing the property tax instead of government paying them subsidies?!)  And since my live rosemary died over last winter and there's a bottle of rosemary essential oil in my cupboard, I adapted it to use that.

You can substitute about any squash you have on hand that is a similar size.  Or use something large, like half a banana squash or pumpkin, or kabocha squash, etc, but if you do, then double the amount of other ingredients except rosemary oil.

Caramelized Butternut Squash with Rosemary 

1 butternut squash
1 tablespoon olive oil
1/4 teaspoon salt
3 tablespoons unsalted butter
2 sprigs rosemary or one drop of rosemary essential oil (better if you have a 1 ml bottle, then use  two of those tiny drops) on top of the butter

Preheat oven to 375 degrees F.
Cut the squash in half lengthwise; scoop out seeds.   (You can wash, roast, and salt these, just like pumpkin seeds.)  Put the squash cut-side up on a baking tray.
Drizzle with olive oil, sprinkle with salt.  In each natural 'bowl' where the seeds used to be, add 1 Tbsp. butter and a rosemary sprig.  EXCEPT:  if using rosemary oil, melt 2 Tbsp. butter and add the drop to it.  Pour half into the cavity of each squash half.  Cover tightly with foil and bake for 45 minutes, or until tender when poked with a fork.

Remove from oven and pull off the foil; let cool until you can handle it.  Scoop out the flesh.  

Heat the last 1 Tbsp. butter in a large skillet over med-hi heat.  Once melted and hot, add the cooked squash.  Gently toss until some parts become caramel-y brown.  Serve hot.

NOTE:  the photo shows the squash as it comes out of the oven, not after being scooped out and browned.  If you want it browned from the oven, do this instead:
When tender, pull off foil and brush the last tablespoon of butter over the cut edges.  Return to the oven and turn on the broiling element.   Broil, checking every minute.  (I am not kidding.  Seriously check every minute!)  If your baking tray is on the middle rack in the oven, this will probably take about 3-4 minutes.  If the tray is up high, close to the element, it might only take 1 minute, maybe 2.

0 Comments

Great-tasting Beet Greens

8/17/2013

0 Comments

 
Picture
The last time I cooked beet greens for my family was about three years ago.  I grew up eating them because I 'had to', and continued it because their nutrition content reads like a fantastic multi-vitamin:  protein, fiber, folic acid, phosphorus, zinc, calcium, iron, magnesium, copper, manganese, potassium, Vitamins A, C, E, K, and three different B vitamins.
But I'll tell you what- after that last time cooking and eating those soggy, bitter greens (I might have burnt them a bit too) all by myself-- sort of plugging my nose as I did-- cuz, dang it, they're good for me!  I thought that'd be the last time I cooked them.

When I pulled the first beets out of the soil this year, though, the old "you oughtta" came back.  This time I was prepared with The Best Vegetable Recipes cookbook from the America's Test Kitchen people.  They had a recipe that could be completed in under ten minutes and sounded like it might not be as terrible as my last attempt.

It was so good I ate seconds.  My husband ate seconds.  My kids at least ate firsts.  And I shared this and Pink Potato Salad with a couple 'foodie' neighbors, who also loved them.  

Not that anyone'd choose this over chocolate; maybe it was just that the greens were much better than anyone's latest memory of them, especially with the crunchy, fragrant nuts and the bit of sweet from the currants.

The amounts and technique will work on any moderately thick green like kale or chard.  (The chard's up next in my yard.)  The original recipe called for cutting out the stems, but they're also good, just take a bit of extra cooking to tenderize.  They can be a little bitter, but the currants countered any of that.

The quantities I used were approximately
1-2 lbs. beet greens
1-2 Tbsp. olive oil
2 cloves garlic (or 1/2 tsp. garlic powder)
1/4 c. pine nuts, chopped  (or other nut you like)
2 Tbsp. currants (chopped raisins work too)

See the slide show for instructions.
0 Comments

Lemon-Summer-Squash Bread

8/1/2013

0 Comments

 
Picture
Everyone knows you can make bread with zucchini- but what if you have a giant yellow summer squash hiding in the garden?

Both zucchini and yellow squash-- either straightneck or crookneck-- are summer squash, with a similar flavor and texture, and CAN be interchanged in recipes.

My family's favorite quickbread is Lemon Zucchini Bread- so today we got Lemon-SummerSquash Bread.  I no longer shred zucchini -or this squash- for recipes, but puree it instead.  No more strings.  As a bonus, if I'm freezing some for later use, the texture does not change when thawed, unlike shredded squash.  

AND, if you're pureeing it, you can have the blender (or food processor) mix all the wet ingredients for you.

This bread is great for breakfast.

The recipe is found over here, though the blender method is below. 
0 Comments

Giving Molluscum the Boot

7/18/2013

1 Comment

 
Picture
Have you seen this before?  It's an example of molluscum contagiosum, and just like its name sounds, it is contagious.  

And yes, we got it.  Lame.

It's caused by a poxvirus and can stick around for quite a while.  Each bump lasts from about 6-12 weeks, but more pop up, so an infection tends to last from 8 months to two years. It can be much longer, especially in those with suppressed immune systems. 

The first time I noticed anything was when a pimple-like thing on my son's arm didn't clear up within the expected few days.  It didn't look quite right.  It reminded me a little of a chicken pox blister, but the symptoms weren't right for that either; there was no fever or anything.  Just about the time the blister finally disappeared, his younger sister had some unusual-looking bumps pop up under her arm.  Then they grew a little and spread to her torso, back, and under the other arm.  About that time I spent some time online trying to discover what this was and how to get rid of it.  If you want to get our solution without reading a bunch more, skip down to the bottom of this.  :)  

Each bump or blister is roughly shaped like a pearl, from 1/8" wide up to the size of a marble, and typically has a dimpled center.  If you pinch it off, a white waxy core often comes out with it, and the exposed spot will bleed more than you expect from such a tiny hole.  The core has the virus, which is just in the skin, so it can't stay dormant somewhere in your system. When it's gone, it's gone unless you pick up an infection somewhere else. It's most common in children under 10, but anyone can get it, and there's no permanent immunity.

It spreads through skin-to-skin contact, even things like shared clothing or towels, which is probably why three of my children got it. Things that make it worse include scratching, moisture (warm places on the body or long soaks in the tub),  a ruptured lesion touching another area, or not washing hands after touching or scratching these.

  I thought maybe they'd clear up on their own, but after 5 weeks had had enough of that, as they continued to spread.  I found all kinds of ideas online to get rid of them:
twice-daily applications of tea  tree oil or apple cider vinegar (both burn a little if undiluted),  salicylic acid, prescription-only chemicals that destroy the top layers of the bumps, liquid nitrogen followed with scraping.  Maybe different things work for different people.  
It turned out that at least 5 families in my neighborhood had children with molluscum, so us moms put our heads together to talk about what we'd each tried.  

One mom had the answer, and it wasn't any of the above.  She'd gone to the doctor (all the moms who did thought the cure was worse than the disease- if the cure even worked.  Which it didn't for most of them.)- paid $80 for a prescription cream, and the cream didn't clear it up, even after weeks.  She finally got on her knees and essentially said, "Lord, I know YOU know how to solve this; please let me know how to help my children."

The idea came to her to put olive oil on them.  So she pinched off all the blisters, being sure to remove the center with the virus.  Then she rubbed olive oil on all the spots at least twice a day, 3 or 4 times a day when she remembered.  They all cleared up.

I  tried it, keeping up the oil-rubbing regimen for about two weeks, getting rid of any new blisters that appeared. 

It worked for us!!!    Hopefully it'll work for you, too.

Picture
The pox up close and magnified. Image: Wikipedia Commons
1 Comment

Canning Butter?

2/25/2013

0 Comments

 
Have you heard that you can bottle butter at home to store for later, without refrigeration?  

The first time I heard about it was from my aunt a few years ago.  Then I kept hearing about it, here and there and everywhere!

It sounded kind of strange.  And scary-- what about botulism?  So I did some research.

The FDA discourages canning butter, as do the USU Extension offices around the country, because of the risk of botulism growth in canned butter.  HOWEVER, it looks to me that this is a case of erring on the safe side.  They, as government entities, are very averse to any kind of risk.  Botulism has about a 10-17% death rate in those who get it, though with the low incidence of this kind of food poisoning, it translates to 2-4 deaths in the US per year. Lightening kills way more people (about 55-75/yr).

Botulism does not grow if the water "activity level" is below .94; salted butter has a water activity rate of .91-.93.  The added salt helps 'tie up' the water, making it unavailable.  That should be in the perfectly safe range, but is apparently too close to comfort for the FDA, who require a water activity rate of .85 in commercially-sold foods. I would not can unsalted butter; its water activity rate is .99 or higher. Another option is to make the butter into ghee before canning, well-made ghee has no water remaining in it. I wasn't able to find what the water activity rate of ghee is, but logic leads me to believe it is under even the FDA comfort range.  I've canned both salted butter and ghee.  I'm more comfortable with the ghee.


If you'd like to read more about it to decide if canning butter or ghee is okay with you, here are some of the sources I learned from:

http://www.ecolab.com/our-story/our-company/our-vision/safe-food/microbial-risks/c-botulinum    

http://books.google.com/books?id=ylWey_KBv7UC&pg=PA337&lpg=PA337&dq=%22water+activity%22+of+%22salted+butter%22&source=bl&ots=18uZLS840j&sig=W8RCozWeTS_FcDIa-MkuRJPJu6I&hl=en&sa=X&ei=jeYFUcTWEc6tygHixICQDA&ved=0CEQQ6AEwAQ#v=onepage&q=%22water%20activity%22%20of%20%22salted%20butter%22&f=false     

http://www.ncbi.nlm.nih.gov/books/NBK50952/ )


0 Comments

Coco-Cocoa Velvet Dessert, and, Is Coconut Bad For You?

1/27/2012

0 Comments

 
Picture
Cool, creamy, and delicious! 

This recipe, adapted to use coconut cream concentrate,  was also selected for the Tropical Traditions recipe blog today!

Recipe is at the bottom of this post.

I’ve been cooking with coconut oil for about two years now.  I also use vegetable oil, olive oil, and butter, but not shortening.  The coconut oil has replaced shortening for me.  It works beautifully in pie crusts, although not so well in frosting, due to its low melting point.

If you’re worried about what you’ve heard about coconut oil, or coconut in general, being a possible health hazard, here’s what I’ve read:

The original studies on the health effects of coconut oil used partially hydrogenated coconut oil, which contains trans fats.  Natural coconut oil does not contain any trans fats.  Most of its natural fats are saturated, but don’t shrink in fear quite yet:  some of these saturated fats are in the form of  lauric acid, which raises HDL (“good”) cholesterol.  In addition to this, saturated fats in general can be broken into at least two subcategories: medium-chain fatty acids, and long-chain fatty acids.  Though they’re both solid at room temperature, they are very different from each other.  Medium-chain fatty acids serve to increase metabolism, and they seem to not recombine easily as fat in the body.  In addition to this, coconut oil helps increase thyroid function.

Several government-run nutrition bureaus strongly recommend against using large amounts of coconut oil, due to the high saturated fat content and fears that it would thus increase heart disease.   In response to this, studies done in high-coconut-oil-use populations actually show more heart disease occurring as they REDUCE the amount of coconut consumption.  The fears seem to be unfounded.

Coconut is also an excellent source of fiber.  One ounce unsweetened dried coconut (about a handful) has 5 grams of fiber  (Four times as much fiber per serving than oat bran!)  About ¾ of the total carbohydrates in coconut are fiber.  Most of this is insoluble fiber, the stuff that helps prevent blood-sugar spikes, slows down your digestion (helping your body extract more nutrients from it, and helping you feel full longer, reducing cravings), helping scrub your intestines, lowering your risk of cancer and several diseases, and providing a good environment for beneficial bacteria (probiotics).  Coconut fiber lowers the glycemic index of the food it’s in.  Some people swear by eating two coconut macaroons a day to treat Crohn’s disease, or Irritable Bowel Syndrome.  

Read more:

http://www.coconutoil.com/research.htm  - a list of the latest research on coconut and coconut oil

http://nutritiondata.self.com/facts/nut-and-seed-products/3107/2- nutrition for several forms of coconut

http://www.livestrong.com/article/98083-coconut-fiber-diabetics/#ixzz1jrVJQkrr- effects of coconut fiber on blood sugar

http://www.earthincommon.com/coconut_02-article.htmlcoconut macaroons to treat IBS and Crohn’s!  Plus, traditional use of coconut to expel parasitic worms; for this, see also http://www.thevirgincoconutoil.com/articleitem.php?articleid=269

http://www.nutraingredients-usa.com/Product-Categories/Fibers-and-carbohydrates/Fiber-may-boost-pancreatic-health-Study/?c=JXuXZ2C%2B3ccDH1LSCcVFdFR3NQxnAszG&utm_source=Newsletter_Product&utm_medium=email&utm_campaign=Newsletter%2BProduct  - report on the latest findings on fiber in general and its effect in preventing pancreatic cancer.


Coco-cocoa Velvet Dessert 

1 1/2 c. coconut milk, divided
1 packet unflavored gelatin (2 1/2 tsp.)
1/3 c. unsweetened cocoa powder
1/3 c. honey
1/8 tsp. salt
1/2 tsp. vanilla
2 drops of orange essential oil, optional  (use food grade or better!)- OR use 1 drop lavender oil
1/2 tray's worth ice cubes (7-8 ice cubes, should be 4 oz.)

Pour 1/2 cup of the milk into a blender.  Add the gelatin, and let sit to soften.  Meanwhile, heat the remaining milk to boiling in a saucepan or microwave.  Pour the hot milk over the gelatin mixture; turn on low  to mix and dissolve.  Add  cocoa powder, honey, salt, vanilla, and essential oil.  Increase blender speed to high.  While motor is running, drop in ice cubes, one at a time.  Blend until smooth.  Pour into four or five (6-oz) ramekins, or in one (2-cup) mold.  Refrigerate until set, 3-4 hours. Serve in the containers, or dip the bottoms in hot water for 20 seconds, then invert to unmold.

If you want to unmold it, I recommend you double the amount of gelatin; I like it extra-firm anyway.

The recipe will work if you use regular milk instead; that's how I grew up eating it, but the version above is great for dairy-intolerant people.  Plus it tastes great!  You can also use chocolate chips instead of cocoa; use 1 cup of chips, and reduce honey to 3 Tbsp. 
Picture
Chocolate and lavender taste very good together, as long as you use a very light hand with the lavender!

Picture
Chocolate-orange...

0 Comments

How much does a year’s supply cost? and Best Drop Biscuits

10/26/2010

0 Comments

 
Picture
Once the dough is mixed, if you use a greased/sprayed 1/4 measuring cup to scoop the dough, you'll get a more traditionally-shaped biscuit.

Picture
Yum.  Tender and light on the inside, crunchy on the outside.  This batch was made with 1 cup whole wheat flour.

How much will your year’s supply cost you?  I just got an emergency supply store’s catalog in the mail; they advertised a year’s supply of food for ‘just’ $3649.95.  For one person.  Is it really that much money to get a year’s supply?

Adding up all the essentials, a month’s worth of food for one person is $16.23

                            A year’s worth for one person is  $194.76

Figure in that you’re getting your year’s supply after building your three-month supply; that knocks it down to getting nine months’worth;

                                                            $146.07 per adult.   

You CAN afford to get your home storage! 

If you really want to spend $3649.95 plus tax, you could buy a year’s supply for not just one person, but for NINETEEN people.  Yes, basic storage is different food than that ‘gourmet’ version, but here’s the counsel we’ve been given:          
"We encourage members world-wide to prepare for adversity in life by having a basic supply of food and water and some money in savings.” “For longer-term needs….gradually build a supply of food that will last a long time  and that you can use to stay alive” (fromAll is Safely Gathered In, First Presidency pamphlet)


Here is the cost breakdown:


Grains, 300 lbs- if you get just wheat and oats, at the cannery they cost between $5.80 and $8.15 for 25 lbs. depending on if you get white or red wheat, quick or regular oats.  If you average this out, it will cost you $6.98 per person, per month.  $83.70 per year’s worth.

Milk, 16 lbs is $1.40/lb at the cannery, which is $1.87 per month, $22.40 per year.

Sugar, 60 lbs is $ .56/lb there, $2.80 per month, $33.60 per year.

Oil, 10 qts –this isn’t sold at the cannery, but the price at Macey’s last week was $2.50 for 1 ½ quarts (48 oz.) At that price, after tax, it’s $1.43 per month, $17.17 per year.  It’s only $14.38 if you buy it at Sam’s Club ($6.98 + tax for 5 qts.)

Salt, 8 lbs- 4# box at Costco or Sam’s Club is a dollar; $ .16 per month, $2 per year.

Legumes, 60 lbs– the cannery sells black beans, pinto, and white, from $14.10 to $16.30 for 25 lbs.  Averaging the prices, it’s  $2.99 a month, $35.92 per year.

Water, 14/gal/person-   You can store this for free by using 2- and 3- liter pop bottles, or juice containers (not milk jugs- they break down).  Or use the 5-gallons square jugs or big blue barrels; they’ll run you about $1 per gallon of storage. 

When you’re done storing these items, you might decide to add a few ‘gourmet’ items- but that’s just extra stuff.

Notice that the costs were just for food, not containers to store them in. Most of my storage containers cost nothing.   You CAN get buckets for free, with a little effort- most bakeries give them away; all their frostings and fillings come in those buckets.  Plan on washing them at home.  There are two main sizes; 5 gallon and 2 1/2  gallon.  I keep packages of dried fruit in the smaller buckets, also cornmeal or other things that I don’t use as much.  They are a great size for a pantry, too.  Some of the buckets have gaskets, some don’t.  The ones that don’t seal well are still good for storing sugar. 

If you want all your wheat, powdered milk, sugar, and legumes in #10 cans from the cannery, it will cost you $85.83 more to get a full year’s worth, $65 to do 9 months' worth.

Here’s the year’s worth breakdown and quantities:    51 cans of wheat $137.80, 11 cans of beans $48.95, 10 cans of sugar $46.50, 4 cans of powdered milk $28.20.

 I don’t can my wheat, sugar, or beans because we go through large quantities; one batch of bread would use a whole can.  Pretty silly storage for me.  Besides, it’s easier for me to find space for 10 buckets than 60 #10 cans; they hold about  the same amount of food.


Best Drop Biscuits
 adapted from Cooks Country
Makes 12

 1 cube butter, melted and cooled a few minutes- set aside 1 Tbsp. of this.
1 cup cold buttermilk or sour milk  (1-2 Tbsp. vinegar in 1 cup regular milk)
2 c. flour
2 tsp. baking powder
½ tsp. baking soda
½  tsp. salt  (3/4 tsp. if you used unsalted butter)
1 tsp. sugar

 Heat oven to 475 degrees, no, that’s not a typo.  Mix together the butter (except reserved) and buttermilk; stir until the butter forms clumps.  (This is a faster way of getting the same results as ‘cutting in’ the butter.)  Mix all the dry ingredients together, then pour in buttermilk mixture.  Stir until just mixed in and dough pulls from side of bowl.   Drop onto  greased or parchment-lined cookie sheet.  A greased  ¼ c. measuring cup makes the perfect size scoop.    Brush with reserved butter.  Bake until tops are crisp and golden, about 12-14 minutes.    Serve warm.  These also reheat well the next day (10 minutes at 300 degrees) and freeze well, too.

You can use powdered milk in this: mix in 3 Tbsp dry milk powder when you’re stirring together the dry ingredients.  Use ice water  and 1-2 Tbsp. vinegar to make 1 cup, stir with the melted butter.

 
0 Comments

Year's Supply quantities, Roast Chicken Dinner with rice, and apple crisp

10/26/2010

0 Comments

 
Hi,

Remember  this?

"We encourage members world-wide to prepare for adversity in life by having a basic supply of food and water and some money in savings.” “For longer-term needs….gradually build a supply of food that will last a long time  and that you can use to stay alive” (from All is Safely Gathered In, First Presidency pamphlet)

Here is what a basic supply of food includes:  it will provide about 2200 calories a day, which means you’ll probably get 1800 and your husband will get 2600.  This is less than most people are used to, especially if you're suddenly living a 'more active' lifestyle, but it will keep you alive!

300 lbs grains- includes Wheat, Rice, Rolled Oats, Dried Corn, Popcorn, Flour, Pasta Products, Dried Potatoes.  Some lists say 400 lbs per person, but the current Church site says 300.  Take your pick, according to what you can handle.  Storage-wise or hunger-wise; that extra 100 lbs provides an extra 435 calories per day.

16 lbs. powdered milk- this is just enough for cooking, about ¾ cup per day.  You can store instant, regular powder, and canned milk.  It takes about 5 (12-oz) cans to equal one pound of powdered milk

60 lbs sugar- this includes white sugar, brown sugar, powdered sugar, honey, molasses, jam/jelly, corn syrup, fruit drink mix, gelatin.  If you have honey that crystallizes, set the bottle in the sun on a warm day, or put it in a pan of water on lowest heat overnight.  It will become liquid again.  You will want more sugar than 60 lbs. if you can your own fruit.

10 quarts cooking oil (2 ½ gallons)- yes, YOU NEED FAT.  Your brain is made mostly of fat.  Guess what happens if you don’t get any fat in your diet?  Plus, it’s a lot of calories for very little storage space.  The darker & cooler you keep it, the longer it lasts.  Fats include shortening, cooking oil, butter/margarine, mayonnaise, peanut butter.

8 lbs salt per person-  this is the cheapest of them all!   In addition to the round canisters, you can buy salt in 4-lb rectangular boxes; these stack together more efficiently.  At Sams’ Club, these boxes are just under $1.  Woo-hoo!  Two bucks and you have your personal salt for the year!

60 lbs. legumes, dried- includes soybeans, pinto beans, white beans, kidney beans, lima beans, anything that ends with ‘bean’ (unless it begins with ‘jelly’), black-eyed peas, split peas, and lentils.  These are a great, inexpensive source of protein.  Store the same as wheat- dry, clean, dark and cool  if possible. It takes 4 ½ (15 oz) cans to equal one pound of dry beans.

14 gallons water per person.  This is just 2 weeks’ supply, for drinking and a tiny bit for washing; the minimum our church leaders have counseled.  You may also want a way to purify water for longer-term use.  To purify, you can boil water for 2 minutes, or use chlorine bleach (plain only, not scented!)  If the water is clear, use ½ tsp. per 5 gallons of water.  If the water is cloudy, use double; 1 tsp. per 5 gallons of water.

Children do not need a full adult’s portion.  For them, figure age 3 and under= 50%, ages 4-6= 70%, ages 7-10= 90%, ages 11 and up= 100%.

Obviously, kids' ages are always changing, so when I calculate what to have on hand ( I inventory every Conference), I project out six months to a year. For instance, if someone is 6 years old, I count that child as 7 years. That way I'm not always slightly behind when it's time to replenish.

 * * * * *

Recipes today are for a whole meal….

Roast Chicken               From Living On a Dime, Jan 2010.  
Here is a very basic but yummy recipe. You can also put this in a crock pot to slow cook all day.


1 (3 lb.) whole chicken
Salt and pepper to taste
1 Tsp. onion powder
1/4 cup butter or margarine 
1 stalk celery, leaves removed

Season the whole chicken inside and out with salt, pepper and onion powder. Place breast side down in pan placing margarine and celery into cavity. Bake at 350° for 1 hour and 15 minutes or until internal temperature is 180° (82° C). You can baste with juices or melted margarine once or twice. Remove from oven and cover with foil for 30 minutes and let it rest before cutting.

You can easily adapt this recipe to your own likes and dislikes. For example, you might use garlic powder instead of the onion powder, you could slide slices of lemons or garlic cloves or even onion slices under the skin. Try other seasonings, too.

The main thing that makes this recipe great is cooking it breast side down, which makes it extra juicy.

Cheesy Peas and Rice

2 1/4 cups rice, cooked                                              
1 (10 oz.) pkg. frozen peas, thawed

1 (6 oz.) can of mushrooms, drained                          
6 oz. Velveeta, cubed*


Combine all the ingredients in a greased 1 1/2 qt. baking dish. Cover and bake at 350° for 20 minutes.

I didn't used to buy Velveeta because it was more expensive than other cheeses, but since it is the same price or less than cheddar now, I buy it more often.


Apple Butterscotch Crisp

This recipe is good served with ice cream or, for something different, try a slice of cheese or a dollop of sour cream.

 5 large (7 small) apples, sliced and peeled               
1 tsp. cinnamon

1 cup brown sugar, depending on your apples           
1/2 cup flour

1/2 cup quick cooking oatmeal                                      
1/2 cup butter or margarine, cold                                     

1 pkg. (3.5 oz.) cook and serve  
          
butterscotch pudding


Place apples in a greased 9x13 pan. Mix everything else in a bowl, cutting in* the butter until it resembles coarse crumbs. Sprinkle over apples. Bake at 350° for 40-45 minutes or until apples are tender.

You can leave out the butterscotch pudding; it won't throw off the recipe. It will still be delicious. 

*Whenever a recipe says to cut in something, that means to take a pastry cutter and mix the butter, margarine or shortening in with the dry ingredients until the mix gets crumbly looking. (I just use my fingers. It is easier for me to wash them than a pastry cutter.)

Roast Chicken Leftovers:

Chicken Spaghetti Bake-  Make your favorite spaghetti, mixing noodles and sauce. Instead of adding hamburger to it or leaving it without meat, add some cubed leftover chicken. Put it in a 9x13 greased pan sprinkle with mozzarella cheese and grated Parmesan cheese. Bake at 350° until heated through and cheese is melted.

Make Chicken Soup with leftovers- see the recipe for turkey soup.  Use ¼ the amount of water and spices for chicken because it’s so much smaller!

Leftover Leftovers- If you have any of this soup left, thicken it with a little cornstarch or flour mixed in water. Make a batch of biscuits or use any leftover biscuits you have and pour the thickened soup (now like gravy) over it.
0 Comments

    Need a Search bar?
    One day I may upgrade my website-- but until then, use your web browser search bar. Type in my web address and what you're looking for, like this-- 
    www.theprovidenthomemaker.com  pumpkin --  and you should get results.


    Author

    I'm a disciple of Christ, a member of the Church of Jesus Christ of Latter-day Saints, a family-defending, homemaking, and homeschooling mom of eight children, two of whom sometimes can't have milk or wheat. Growing up on a farm in a high mountain valley, my parents taught me to 'make do', work hard, smile, and help others.  I love cooking, learning, growing food and flowers, picking tomatoes, and making gingerbread houses --which CAN be made allergy-friendly-- with my children.  I hope you find something to help you on my site!

    Archives

    April 2024
    July 2023
    April 2022
    September 2021
    March 2021
    December 2020
    April 2020
    March 2020
    February 2020
    January 2020
    December 2019
    November 2019
    October 2019
    September 2019
    August 2019
    July 2019
    June 2019
    May 2019
    April 2019
    January 2016
    November 2015
    October 2015
    September 2015
    March 2015
    February 2015
    November 2014
    October 2014
    September 2014
    August 2014
    July 2014
    June 2014
    May 2014
    April 2014
    March 2014
    February 2014
    January 2014
    December 2013
    November 2013
    October 2013
    September 2013
    August 2013
    July 2013
    June 2013
    May 2013
    April 2013
    March 2013
    February 2013
    January 2013
    December 2012
    November 2012
    October 2012
    September 2012
    August 2012
    July 2012
    June 2012
    May 2012
    April 2012
    March 2012
    February 2012
    January 2012
    December 2011
    November 2011
    October 2011
    September 2011
    August 2011
    July 2011
    June 2011
    May 2011
    April 2011
    March 2011
    February 2011
    January 2011
    December 2010
    November 2010
    October 2010
    September 2010

    Categories

    All
    Alcohol
    Alternate Cooking
    Appearances
    Apple
    Apricots
    April Fools
    Aprons
    Bananas
    Beans
    Beef
    Beets
    Bench
    Beverages
    Bonnet
    Bread
    Breakfast
    Budget
    Budgeting
    Cake
    Candy
    Canning
    Carrots
    Cheese
    Chicken
    Children
    Chocolate
    Christmas
    Cleaning
    Coconut
    Comfrey
    Common Core
    Constitution
    Cookbook
    Cookies
    Cooking Oil
    Crafts
    Dairy Substitutions
    Dehydrating
    Dessert
    Dried Fruit
    Earth Oven
    Earthquake
    Easter
    Edible Weeds
    Eggs
    Emergency Prep
    Essential Oils
    Faith
    Family Home Evening
    Fertilizing
    Food Storage
    Fourth Of July
    Freezer
    Frosting
    Fudge
    Garden
    Gardening
    Gingerbread
    Gluten
    Gluten Free
    Gold
    Government
    Grains
    Gratitude
    Hat
    Herbs
    Home Remedies
    Home Repairs
    Homeschool
    Home Storage
    Honey
    Hope
    Inflation
    Leftovers
    Legumes
    Lemon
    Main Dishes
    Mixes
    Mothers
    Noah
    Non Artificial Colors
    Non-artificial Colors
    Nuts
    Oats
    Oil
    Orange
    Paint
    Peaches
    Pear
    Pie
    Pizza
    Plums
    Poem
    Popcorn
    Pork
    Potatoes
    Powdered Milk
    Prayer
    Preparedness
    Projects
    Prophecy
    Pruning
    Pumpkin
    Quick Bread
    Rhubarb
    Rice
    Salad
    Salt
    Sauces
    Self Reliance
    Self-reliance
    Sewing
    Shelf Life
    Shelves
    Sky
    Smoothie
    Snacks
    Soup
    Spices Or Seasonings
    Squash
    Strawberries
    Substitutions
    Sugar
    Summer Fun
    Three Month Supply
    Time
    Tomatoes
    Trees
    Truffles
    T-shirts
    Tuna
    Ultra Gel
    Valentine\'s Day
    Vegetables
    Water
    Watermelon
    Wheat
    Work
    Year Supply
    Zucchini

    RSS Feed

Web Hosting by iPage